LooLoo's Box Banner

LooLoo's Box Banner
LooLoo's Box Handcrafted Jewelry: Artisan Jewelry, from Sterling to Steampunk

Monday, April 8, 2013

Tutorial: 'Remembering Mimi' Floral Locket Pendant Brooch

Tutorial: 'Remembering Mimi' Floral Locket Pendant Brooch

My maternal grandmother died at age 51 when I was in the third grade;  I still miss her 40+ years later. Her name was Ethel, but when I first tried to say 'Grandma' it came out 'Mimi'... and Mimi she was, to friends and family alike, for the rest of her days.  This photo of her, in her back yard rose garden, is a favorite of mine and the inspiration for this project, which is going to be gifted to my mom on Mother's Day.  I hope this may inspire you to create something in your own style that is meaningful to you.

This project is probably considered Intermediate in terms of difficulty.

Tools:

Materials:


Figure 1
Figure 1. If your locket is raw brass, patina it however you like (I used Birchwood Casey Antique Black M-24 from Sculpt Nouveau, but Swellegant Dark Patina Medium gives a very similar look without the need to invest in a large bottle.)

This locket has a swedge hole, but it will be hidden under the hat. Seal the locket in and out.

Figure 2
Figure 2. The hat really didn't need much more than a good cleaning and buffing, as I like the old patina.  I drilled two holes, either side, for riveting the hat to the locket; using spring clamps to hold it in place I drilled corresponding holes in the front of the locket.

Rivet the hat to the locket. Note: Riveting is important; lockets get opened and closed and glue may fail under the stress of repeated tugging.


Figure 3

Figure 3. Cut apart your leaf sprays and smooth the cut ends. Buff well; I used a brass brush on my flex shaft.

I used a green Sharpie permanent marker to color the ribbon trim on the hat, as well as the accent leaves; a red Sharpie colored the molded flowers. Let dry, then seal.


Figure 4

Figure 4. After coloring and sealing, I bent the leaf accents around the crown of the hat, securing with E6000 and spring clamps. Allow glue to dry, police up any stray glue and seal the entire hat.

I like the way it looked at this stage, and may do another and leave it more like this.


Figure 5
Figure 5. Next I added tiny flowers to the brim of the hat, adhering them with E6000. I used a mixture of raw brass, brass ox and Old Rose Ox.

A touch of red Sharpie on some of the petal tips added a bit more color.

Clean up any stray glue, then allow it to cure for 24 hours. Once the glue has cured, give the hat and locket a final cleaning, buffing (if necessary) and another coat of sealer, if you used raw brass.

Set the rhinestones into the center of the flowers using G S Hypo Cement. If your stones are unfoiled, or if you are using beads or pearls, you can use E6000.

Figure 6
Figure 6. The filigree I used was dapped, so I flattened it with my rubber mallet and steel bench block. I then cut it in half diagonally with my Joyce Chen scissors, smoothed the cut edge using a grinding wheel on my flex shaft, then buffed it well with a brass brush on my flex shaft. Sealed with Renaissance wax.


Figure 7
Figure 7. Rivet the pin onto the back of the filigree, using two 3/32" brass tube rivets.

Tip: Open the pin so it's out of the way. Align the finding and hold in place with a spring clamp. Drill hole in filigree through the hole in the pin finding. Rivet and repeat.


Figure 8
Figure 8. I riveted the pearl cup into the center of the leaf, then glued the assembly to the center of the filigree.  In this case I couldn't rivet it in place because the bail was in the way.


Figure 9
Figure 9. Layer and rivet flowers and glue the assemblies and accent leaves in place.  Clean up the glue and allow to cure for 24 hours. Clean and seal, if necessary.

Set the rhinestones and the central pearl, then attach the two parts using jump rings.


These are the photos that are going inside. Mom's going to love it.  :-)

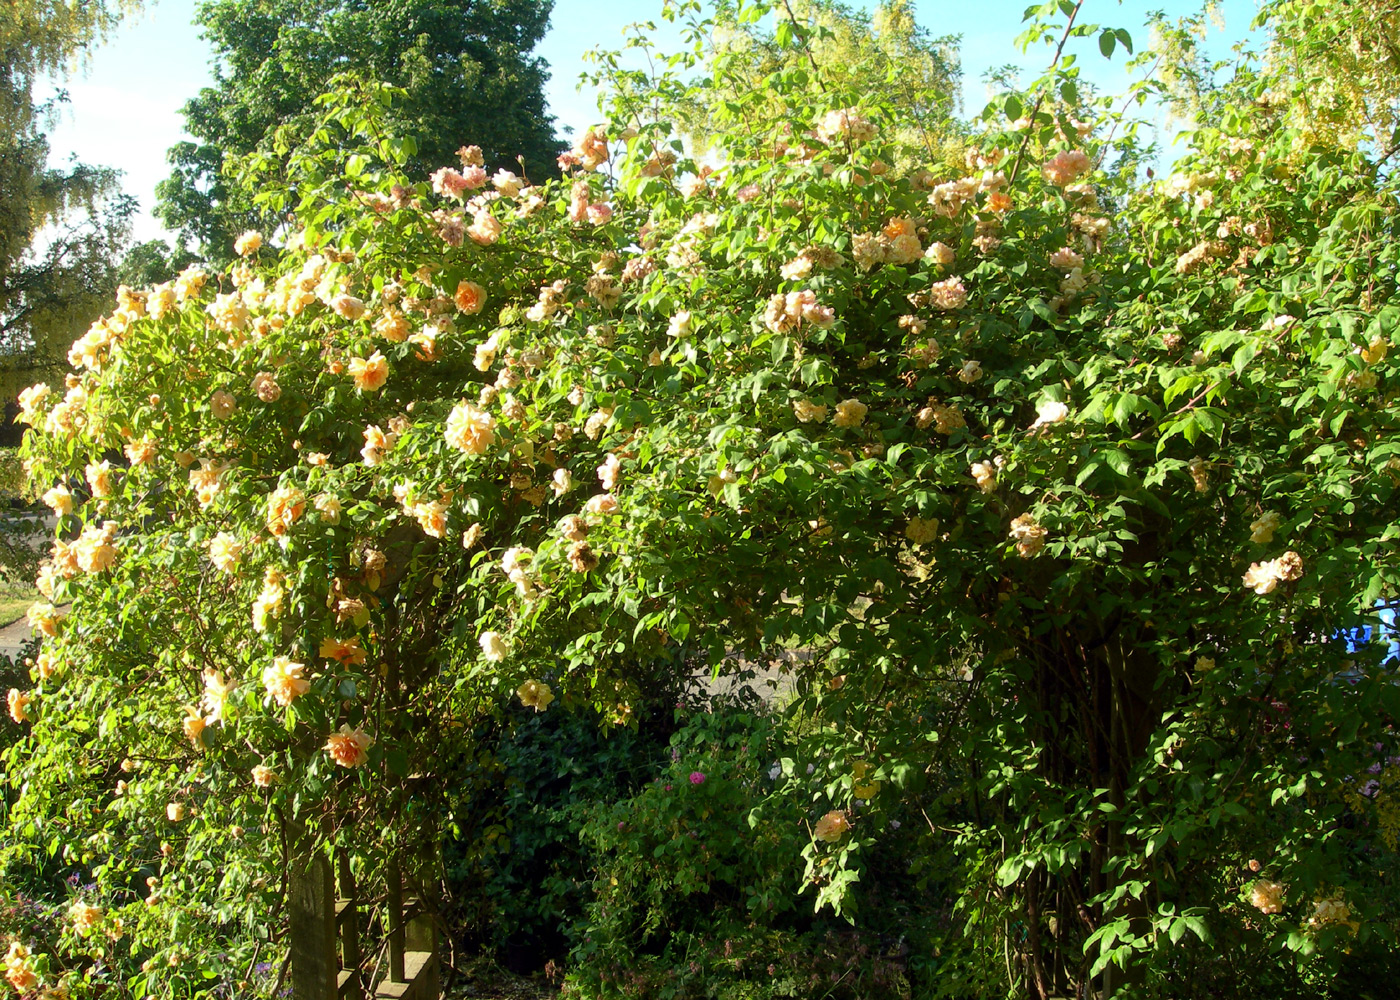
Mimi in her garden and with newborn baby Robin (me).


Robin (me) at 50
Mimi was born in 1919 and died of ovarian cancer at 51 years old on April 19, 1971.  I turned 50 this past December; she was only 43 when I was born. She grayed young, so I always thought of her as 'grandma-aged', although my mom at 70 has very little gray in her dark chestnut hair and I have none (and no, I do not color my hair... at least, not yet!) It may be wishful thinking on my part, but I do think I see a resemblance. 

She was also very artistic; she had a porcelain studio in her basement and created wondrous things from clay slip and molds as well as beautifully painted Made in Occupied Japan china. I treasure the few things from her hand that have survived to this day.  

The anniversary of her passing approaches and she is very much on my mind.  She is always in my heart.

I love you, Mimi.

Ta,

~R.

Wednesday, March 13, 2013

Tutorial Part 2: 'The Royal Secret Keeper' - The Finished Necklace!

Welcome back!

Yesterday I showed you how I made the layered locket itself for 'The Royal Secret Keeper'.  The adhesive has had time to cure and today I finished the necklace. It turned out rather well, if I do say so myself.

Before beginning the necklace portion of the project I touched up the patina on the locket itself and gave it a good cleaning before sealing it with Renaissance Wax.

On to the necklace!

I made a custom connector from raw brass filigree to harmonize with the filigree on the locket.  I cut the filigree in half with my Joyce Chen Unlimited Scissors, which are indispensable for cutting filigree and light sheet metal, as they give a lot of control and cut through like butter.  Be careful, they cut flesh like it wasn't even there; ask me how I know.


After cutting apart the filigree I smoothed the cut edges with a grinding tip on my flex shaft, then went over the filigree with the brass brush.  I do appreciate the quick change hand piece, because I change tools on my flex shaft constantly.


I then drilled a hanging hole at the bottom and riveted a pronged pearl setting to the front of the connector and added a matching cultured freshwater pearl.


Now it's time to construct the necklace.  I wanted this to be a rich, harmonious melding of golden to brown, with silver as an accent color. Here's my materials list for the necklace:

  • (8) 11mm x 9mm silver peacock cultured freshwater pearls
  • (6) 6mm raw brass filigree beads
  • (16) 5mm brass ox plated daisy spacer beads
  • (16) 3mm raw brass round beads
  • (12) 4mm silver ox plated daisy spacer beads
  • (12) 2.5mm silver plated brass beads
  • (11) 9mm raw brass rope-twist pattern heavy jump rings
  • (2)  16mm raw brass rope-twist pattern heavy jump rings
  • (24) 9mm x 6mm raw brass links from a chain
  • (1) 13mm raw brass smooth heavy jump ring
  • 22 gauge NuGold brass wire
  • ... and a hand forged hook made from 12-gauge NuGold brass wire.


The patina products are the same as I used yesterday on the locket itself.

First I needed to spruce up my filigree beads; they are vintage and were dull and grungy.  I strung them onto long headpins and made a loop at the end so they won't fall off; when I hit them with the brass brush on my flex shaft they spun on the axis like they were on a lathe and were brushed clean in a jiffy! Then I washed them, dipped them to remove the old patina and re-patina'd and brush-polished them again.  The difference was really much more striking than the photo shows.


If you take one thing away from my experience, it's the trick of stringing the beads on a headpin and gang-polishing them.  It's probably been done before, but I hadn't heard of it before and I nearly threw my shoulder out from patting myself on the back.

I gang-polished the brass jump rings in much the same way - threaded them on a heavy wire loop and laid into 'em with that brass brush disc.

This is really a simple pattern using two styles of wire wrapped beads - genuine cultured pearls and brass filigree.  I did linked sets of three, interspersed with a wrapped pearl on its own.


The pattern goes 'link of three' - oblong brass link, round brass link, oblong link - wrapped pearl - oblong brass link, round brass link, oblong link - 'link of three' and repeats... EXCEPT!  Yes, I had to make it tricky.  I wanted the hook in the front, on the left side, which meant that I needed to play with the rings so the two sides would be balanced.  I'll spare you the blow by blow, because I used some unladylike language before I got it sorted.

Once I got the tricky bit figured out it was a simple job to wrap the rest of the links and assemble the necklace.  All it needs now it a final wash and sealing with Renaissance Wax, which I will do tomorrow.  

So without further ado, I present 'The Royal Secret Keeper'. It's just under 26 inches long and I love it! I may keep it, if only because it would have to be a relatively expensive piece due to the time and materials.  I'll crunch numbers tomorrow.

So, what do you think?  I welcome input - how could I have made this tutorial better? What kind of blog posts and/or tutorials are you interested in? Please leave suggestions in the comments (or through Facebook) and have a wonderful day!

~R.

P.S. I hope you are inspired to use these techniques to create your own original designs!


Tuesday, March 12, 2013

Tutorial Part One: 'The Royal Secret Keeper' Locket

I get asked pretty often - especially at shows - what goes into the making of my pieces, so I decided to show the world how I made 'The Royal Secret Keeper', which is a layered brass locket necklace.  Because of the mixed finishes and the multiple layers, I am using E6000 - an industrial strength adhesive - to assemble this piece.  It is very, very strong.

Here are the materials I used for the locket itself (click photos to enlarge): 
  • One vintage brass locket, 38mm in diameter
  • Two silver plated filigrees
  • One sliver ox pronged setting for a 20mm stone
  • One dapped brass filigree, 20mm in diameter
  • One brass crown setting
  • One silver peacock coin pearl


Not Pictured:
  • One silver plated brass rivet
  • Eight tiny 5pp rhinestones
  • Sculpt Nouveau Antique Black Patina
  • E6000 adhesive
  • G-S Hypo Cement adhesive

1.) First I buffed the locket well with a brass brush in my Flex Shaft, washed it well, rinsed it in vinegar to remove any remaining grease, rinsed again and then applied the patina.  I use Sculpt Nouveau's Antique Black, but Swellegant (which is based on Sculpt Nouveau) works really well if you don't want or need large quantities.

Once the patina is where I want it,  I rinse it under clear water, dry it, then buff it again.

Raw Brass Locket: Before and After Patina & Polishing


2.) The locket isn't flat, so the filigree needs to be dapped to follow the contours of the locket.  I used a wood dapping block and the rounded end of one of my hammers to gently shape both filigrees.

Filigree inside dapping block

 3.) One side at a time and using spring clamps, glue the dapped filigrees to the clean locket with E6000, allowing the glue to set well before doing the other side.  My locket had a swedge hole on the front side, so the attachment is also reinforced with a rivet.  The rivet was a bit too long so it's not the tidiest riveting job, but it won't be seen so I am not concerned.  It is an aesthetic issue only.

4.) Remove the hanging loop from the setting; file smooth.  Glue setting to the front of the locket; clamp until set.


Locket front with filigree and setting

I had originally planned to stop here and finish the locket with a cabochon, but none of my hand cast resin ones looked quite right and I am out of 20mm stone or glass cabs.  

5.) Layer on the brass filigree atop the setting and secure with the prongs.
6.) Glue the crown setting atop the filigree.  Let dry.
7.) Set the coin pearl.
8.) Add the tiny rhinestones to the holes around the edge of the filigree, using G-S Hypo cement.


All it needs are the rhinestones

Here's the locket, ready for final finishing.  All it needs now is for me to police up any stray glue (I cannot abide visible glue or solder!) and then allow the entire piece to cure until tomorrow, at which time I will give the whole piece a thorough cleaning, tweak the patina, polish it well and then seal it with Renaissance Wax.


Ready for final cleaning, polishing and sealing.

Next time: the finished necklace!

Thank you for visiting my cyber workshop, and I hope you'll come back for more. 

~R.

P.S. I hope you are inspired to use these techniques to create your own original designs!

Friday, June 15, 2012

Everything's Coming Up Roses, Part Two

After an embarrassingly long delay, I am finally taking you on a tour of the back yard.  We practically live out here when the weather cooperates; even simple meals taste stupendous when you are sounded by the heady aroma of hundreds of rose blooms.

'Constance Spry'; English Rose Climber, 1961

'Radiance'; Hybrid Tea, 1908

'Seagull'; 1907

Seagull, in Italian Prune tree

Foreground: 'Francesca', 1922 and 'Danae', 1913.  The pink rose in the center back is 'Applejack', 1973

Climbers: 'RĂªve d'Or', 1869 and 'Sombreuil', c. 1880.

Once-Bloomers, L-R: 'Gloire de France', 1828; 'Belle de Crecy, <1836; 'Bella Donna', <1848; 'Mme. Plantier', 1835; 'Mme. Antoine Mari', <1890.

A riot of roses.

Foreground: 'Lady Hillingdon', 1910

Upper Left to Lower Right: 'Sombreuil', c. 1880; "Portland from Glendora", found rose; 'Mme. Joseph Schwartz', 1880; 'Marchesa Boccella', 1842; 'Baby Love' (yellow) 1992

'Buff Beauty', 1939

~ * ~ * ~ * ~ * ~ * ~

Here are a couple photos I took today.

Baby roses (gallon size) in the greenhouse.  We were going to have a sale but did a jewelry show instead.  We have got to have a sale in July and find these babies homes!

We're eating right here just about every day that the weather allows.  it sure smells good...

This arbor is the path to the chicken coop, behind the garage.  :-)
Well, that's enough for now.  I hope you enjoyed visiting my rosy corner of the world!


Saturday, April 28, 2012

Everything's Coming Up Roses, Part One

Crepuscule rose
'Crepuscule' (1904), front arbor;
Click to view in all her glory
My blog post for yesterday's blog hop generated a lot of comments about my garden.  I grow over 200 varieties of roses, from merely 'old' to truly ancient.  I grow some roses that predate Christianity.  I love everything about them, but mostly their rich history.  They have stories.  And they smell really really REALLY good.  :-)

It's early yet for garden pics, so I thought I'd share some of my favorite rose garden photos, this time looking at it through my artist's eye. Inspiration strikes when it chooses, but it certainly helps to invite it in.  

I've posted my reference diagram for those who like this sort of thing. Most of these photos were taken in June of 2009, with a few from 2007. There have been a few changes since then; roses added, some deaths, some moved, but the overall effect is the same.  When first flush (May - July) is on you can smell my garden from blocks away, and everybody under the sun walks their dogs past my house.  I feel honored every time someone stops to smell the roses.

In the interest of loading times, I am splitting this tour into two blog posts - Front and Back.

We begin in the front, including the front parking strip and corner and down the sides - in short, everything that is outside of the fenced back yard.

Largely accurate, with a few additions, deaths and relocations.
I really need to update this.
The best shot I have, although it is older, before the new paint.
Those upper windows are my workroom.
From the kitty-corner neighbor's yard
Down the side; that second story window is our bedroom
'Mutabilis' dominates the corner
Closeup of 'Mutabilis', aka 'The Butterfly Rose'.
'Aloha' and 'Abraham Darby' against the front porch
'Aloha' & 'Abraham Darby' against porch; 'Golden Wings' front R.
The red was in a pot; I think it is 'Zulu Queen'.
Between the house and the front sidewalk, left side.
'Graham Thomas' (yellow), with 'Coupe d'Hebe' (pink) to the right
Front parking strip; 'Pat Austin'
Between front porch and sidewalk
To the left of the front steps; 'Eden' (aka 'Pierre de Ronsard')
Front arbor; 'Crepuscule' (foreground) & 'Jaune Desprez'
 

Front arbor: 'Crepuscule' on left, 'Jaune Desprez' on the right.
Front parking strip, Golden Chain tree in full bloom
Golden Chain tree
Headed down the side - the pink rose is 'Bewitched'
The side patch in 2005 - the red climber is 'Don Juan'
The same bed in 2009.  Yikes!!!
The pink rose is 'Zepherine Drouhin'
An old musk rose propagated from a cutting I snitched from
a historical garden in Port Townsend, WA (The Rothschild House).
'Roseraie de l'Hay', my most ambitious rose rescue to date.  It's a great story and I took lots of photos; perhaps I'll blog about it one day.

My next blog post, in a day or two, will be of the back garden retreat.  We eat out there as often as not during the summer; food and wine are even better when enveloped in the heady aroma of heirloom roses.

Until next time,

Robin Delargy
LooLoos Box